组件之间的交互主要是在主从组件之间进行交互。那么
Angular组件之间怎么进行交互?下面本篇文章给大家介绍一下Angular组件间进行常用交互的方法。

【相关教程推荐:《angular教程》】
1、通过输入型绑定把数据从父组件传到子组件
child.component.ts
export class ChildComponent implements OnInit {
  @Input() hero: any;
  @Input('master') masterName: string;      // 第二个 @Input 为子组件的属性名 masterName 指定一个别名 master

  constructor() { }

  ngOnInit(): void {
  }

}
child.component.html
<div style="background-color: #749f84">
  <p>child works!</p>
  <h3>{{hero?.name}} says:</h3>
  <p>I, {{hero?.name}}, am at your service, {{masterName}}.</p>
</div>
parent.component.ts
export class ParentComponent implements OnInit {
  hero = {name: 'qxj'}
  master = 'Master'

  constructor() {
  }

  ngOnInit(): void {
  }

}
parent.component.html
<app-child [hero]="hero" [master]="master"></app-child>
2、父组件监听子组件的事件
child.component.ts
export class ChildComponent implements OnInit {
  @Input()  name: string;
  @Output() voted = new EventEmitter<boolean>();
  didVote = false;

  vote(agreed: boolean) {
    this.voted.emit(agreed);
    this.didVote = true;
  }

  constructor() { }

  ngOnInit(): void {
  }

}
child.component.html
<h4>{{name}}</h4>
<button (click)="vote(true)"  [disabled]="didVote">Agree</button>
<button (click)="vote(false)" [disabled]="didVote">Disagree</button>
parent.component.ts
export class ParentComponent implements OnInit {
  agreed = 0
  disagreed = 0
  voters = ['Narco', 'Celeritas', 'Bombasto']

  onVoted(agreed: boolean) {
    agreed ? this.agreed++ : this.disagreed++
  }

  constructor() {
  }

  ngOnInit(): void {
  }

}
parent.component.html
<h2>Should mankind colonize the Universe?</h2>
<h3>Agree: {{agreed}}, Disagree: {{disagreed}}</h3>
<app-child *ngFor="let voter of voters" [name]="voter" (voted)="onVoted($event)"></app-child>

3、父组件与子组件通过本地变量互动
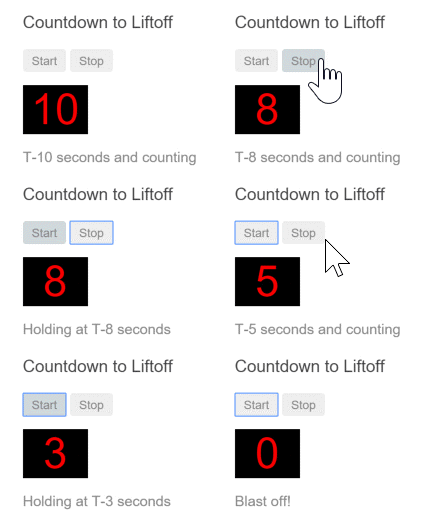
父组件不能使用数据绑定来读取子组件的属性或调用子组件的方法。但可以在父组件模板里,新建一个本地变量来代表子组件,然后利用这个变量来读取子组件的属性和调用子组件的方法,如下例所示。
子组件 CountdownTimerComponent 进行倒计时,归零时发射一个导弹。start 和 stop 方法负责控制时钟并在模板里显示倒计时的状态信息。
child.component.ts
export class ChildComponent implements OnInit, OnDestroy {
  intervalId = 0
  message = ''
  seconds = 11

  clearTimer() {
    clearInterval(this.intervalId)
  }

  ngOnInit() {
    this.start()
  }

  ngOnDestroy() {
    this.clearTimer()
  }

  start() {
    this.countDown()
  }

  stop() {
    this.clearTimer()
    this.message = `Holding at T-${this.seconds} seconds`
  }

  private countDown() {
    this.clearTimer()
    this.intervalId = window.setInterval(() => {
      this.seconds -= 1
      if (this.seconds === 0) {
        this.message = 'Blast off!'
      } else {
        if (this.seconds < 0) {
          this.seconds = 10
        } // reset
        this.message = `T-${this.seconds} seconds and counting`
      }
    }, 1000)
  }

}
child.component.html
<p>{{message}}</p>
parent.component.ts
export class ParentComponent implements OnInit {
  constructor() {
  }
  ngOnInit(): void {
  }
}
parent.component.html
<h3>Countdown to Liftoff (via local variable)</h3>
<button (click)="child.start()">Start</button>
<button (click)="child.stop()">Stop</button>
<div class="seconds">{{child.seconds}}</div>
<app-child #child></app-child>
4、父组件调用@ViewChild()
这个本地变量方法是个简单便利的方法。但是它也有局限性,因为父组件-子组件的连接必须全部在父组件的模板中进行。父组件本身的代码对子组件没有访问权。
如果父组件的类需要读取子组件的属性值或调用子组件的方法,就不能使用本地变量方法。
当父组件类需要这种访问时,可以把子组件作为 ViewChild,***注入***到父组件里面。
countdown-parent.component.ts
import {AfterViewInit, Component, ViewChild} from '@angular/core'
import {ChildComponent} from '../child/child.component'

@Component({
  selector: 'app-parent-vc',
  template: `
    <h3>Countdown to Liftoff (via ViewChild)</h3>
    <button (click)="start()">Start</button>
    <button (click)="stop()">Stop</button>
    <div class="seconds">{{ seconds() }}</div>
    <app-child></app-child>
  `,
})
export class CountdownParentComponent implements AfterViewInit {

  @ViewChild(ChildComponent)
  private timerComponent: ChildComponent

  seconds() {
    return 0
  }

  ngAfterViewInit() {
    // Redefine `seconds()` to get from the `ChildComponent.seconds` ...
    // but wait a tick first to avoid one-time devMode
    // unidirectional-data-flow-violation error
    setTimeout(() => {
      this.seconds = () => this.timerComponent.seconds
    }, 0)
  }

  start() {
    this.timerComponent.start()
  }

  stop() {
    this.timerComponent.stop()
  }
}
更多编程相关知识,请访问:编程入门!!
以上就是Angular组件间怎么进行交互?常用交互方法介绍的详细内容,更多请关注亿码酷站其它相关文章!
Angular组件间怎么进行交互?常用交互方法介绍
—–文章转载自PHP中文网如有侵权请联系ymkuzhan@126.com删除
本文永久链接地址:https://www.ymkuzhan.com/29409.html

 成为VIP
成为VIP
